

Creating a channel on YouTube is not difficult. You can create your channel on YouTube by following just 10 steps. Let us know how you can create a channel on YouTube and what is necessary to earn…


If you want to showcase your skills on a bigger platform, then YouTube can be a great way. By uploading videos on this platform, you can earn thousands and lakhs just like others. However, for this it is necessary that your channel on YouTube is a YouTube channel. Creating a channel on YouTube is not difficult. You can create your channel on YouTube by following just 10 steps.
Follow these steps to make YouTube channel and earn

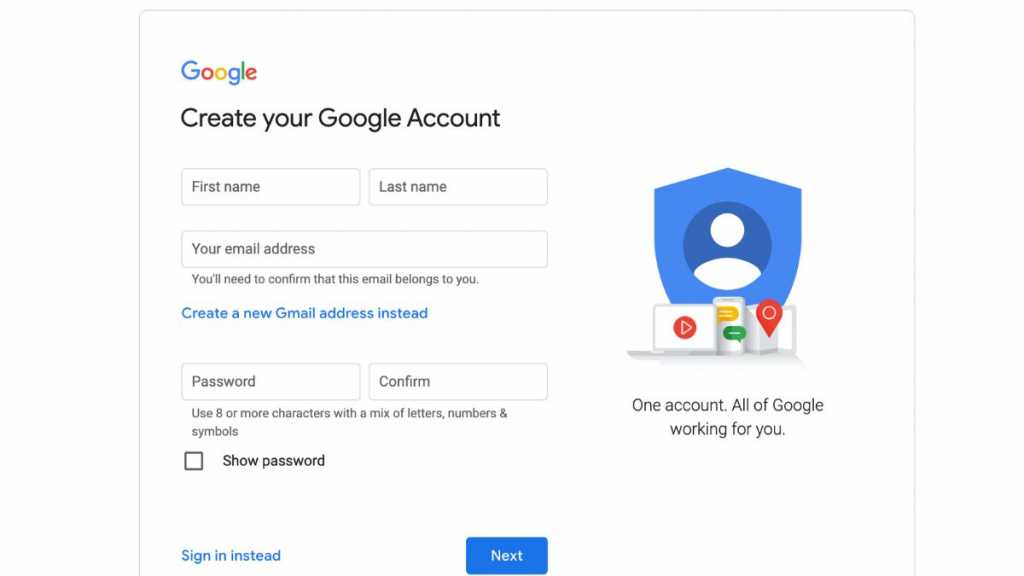
1. Login with Gmail account
To start a YouTube channel, it is necessary to have a Google ie Gmail account. If you do not have a Google account, first create a Google account or after going to www.youtube.com, you will see the sign-in option on the top right. Google account can also be created by clicking on it.
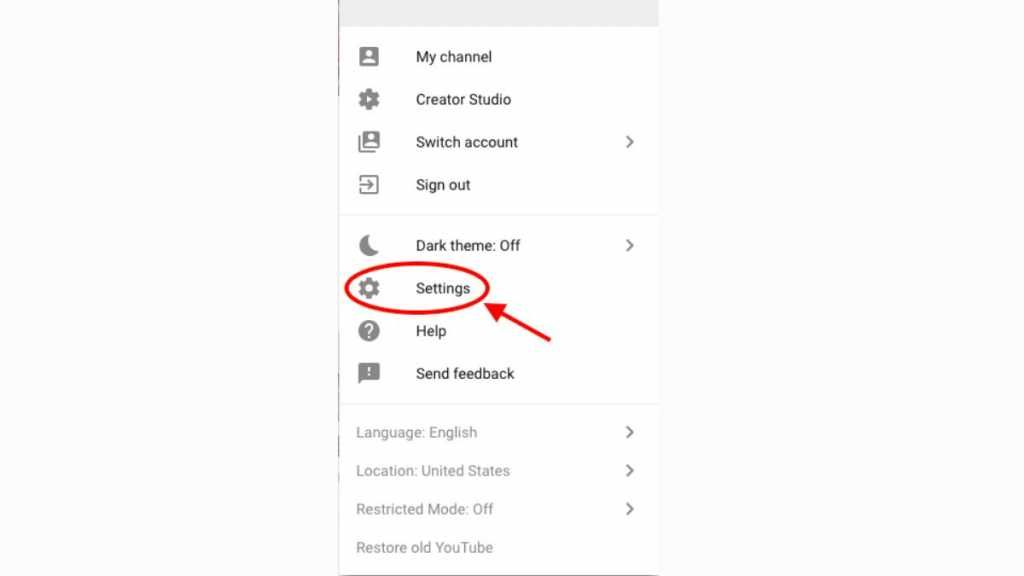
2. go to settings
After completing the sign-in process, you will see a profile icon on the top right corner of www.youtube.com. After clicking on that scroll down, you will find the Settings icon at the bottom with Creator Studio. After clicking this, in the Your YouTube channel section, you will see the option of ‘Create a channel’.
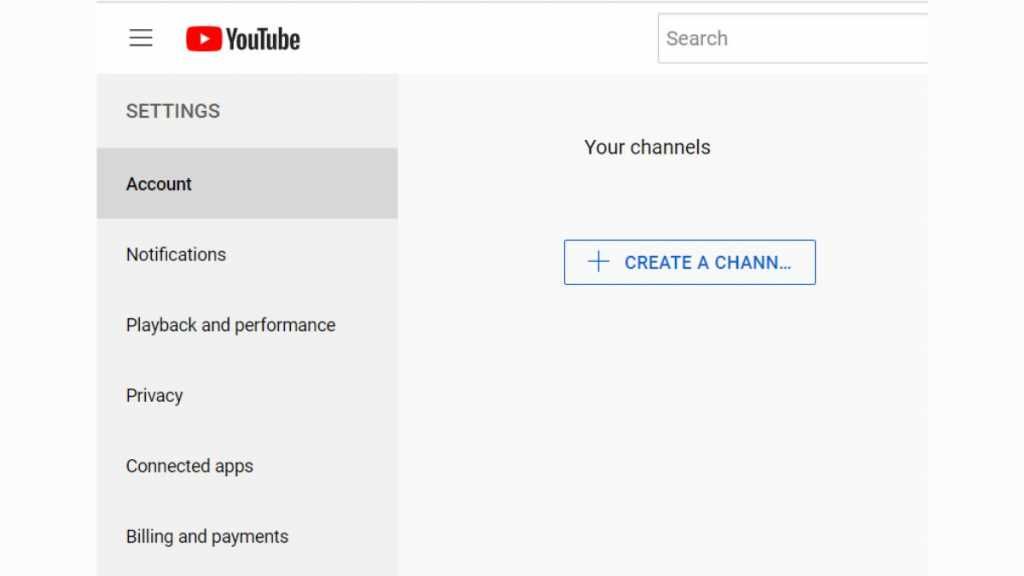
3. Create Channel Will get the option of
After going to the option of create channel, here you can create a channel with personal, business or other name. For example, if you want to start a channel for business purpose, then you will get the option of Product, Brand, Institution, Organization, Art, Sports etc.
4. Enter a name for the channel
You should name your channel in such a way that it can attract people to visit the channel. While choosing the name of the channel, keep in mind that it should be related to the topics related to your channel. After selecting the name, you have to select the category. After that, the box has to be clicked to agree to the terms and conditions associated with the YouTube channel. Then click on the Done button at the bottom. Your YouTube channel is now officially ready.

5. Youtube Channel Art cover photo from
After the YouTube channel is ready, now like the cover photo of Facebook, you can also put a cover photo here. The ‘Channel Art Feature’ is the main place for this. Here the photo should be related to your personality or your brand, so that people will know on seeing which topic your channel is based on. For example, if you are making a channel related to gadgets, then it would be good to put a cover photo related to it.
6. Profile Image set to
To change the profile image in YouTube channel, one has to select the pen icon, which appears when you move the cursor over the default profile image. If you do not yet have a profile image related to your channel, you can choose a photo from YouTube’s background image gallery. The image for the cover photo should be 2560×1440 pixels and the size should be less than 4MB. In this way you can give a great look to your channel.
7. Write a beautiful description of the channel
You can write an attractive description related to the topic on which your YouTube channel is based. There is a limit of 1000 characters for this. In the same number of characters, you can write description about your channel in a creative way.
8. Connect with social media account
You can connect it to social media to make your channel popular. To link a Twitter account with a channel, go to the channel’s settings. Here you will get the option of ‘Connected Account’. Here you can connect your channel with Twitter. You can also get updates as per your preference by adjusting the settings.
9. Edit video
In the settings, you will find the option of ‘Create’, in which the option of audio library, music policies and video editor has been given. You can add music, effects, text, etc. along with editing the video by going to the video editor. Now your youtube channel is ready.
10. Now upload your video
Now your youtube channel is ready for video upload. For video upload, video upload (upward arrow sign) option will be found next to the profile icon on the right side of the YouTube channel. You can upload a video by clicking on it. Here you will get the option of Public, Unlisted and Private. Now you have to decide in which mode to keep the video. Apart from this, to edit the likes and subscriptions of the channel, one has to go to the account settings menu and click on privacy. Additionally, you can manage notifications in the Account Settings menu.

How to verify YouTube account
When you have created your channel, then it is also necessary to verify it. Once your channel is verified, then you can take advantage of many features. You will be asked to enter your phone number to verify your channel. A verification code will then be sent by text or voice call to the phone number. Once you have verified your YouTube account. Then you also get the following features…
- You will be able to upload videos longer than 15 minutes.
- You will be able to add custom thumbnails with videos.
- If you want, you will be able to stream live from YouTube channel.
- Can appeal claims on Content ID.
- If you’ve already created enough channel history, verifying your YouTube account will unlock advanced features.
How to earn from youtube channel
If you want to monetize your channel on YouTube, it is important that your channel follows the monetization policies on YouTube. These also include YouTube’s Community Guidelines, Terms of Service, Copyright and Google Adsense Program Policies. If you want to monetize videos with ads, you must also meet the advertiser-friendly content guidelines. You get the facility to earn money only after becoming a YouTube partner. You must check that you live in a country/region where the YouTube Partner Program is available. There are no active Community Guidelines strikes on your channel. In addition, it is also necessary to have more than one thousand subscribers with more than 4,000 valid public watch hours in the last 12 months. With this you will need a linked Adsense account.
How to apply for monetization
If you follow the terms and conditions of YouTube, then you can apply for YPP.
- First of all, 2 step verification is necessary for your Google account. Only channels that meet YouTube’s policies and guidelines are accepted into the program. If your channel meets the threshold of at least 1,000 subscribers and 4,000 valid public watch hours, then you can apply for YPP. Then sign in to YouTube. Click on your profile picture in the top right and then on YouTube Studio. Click on Monetization in the left menu. Then click on Review Partner Program Term Card. Once you have signed the term, then the step will show the done in green color.
- After this you will need an Adsense account. Adsense account is necessary to get money. Then click on Sign up for Google Adsense. If you already have an Adsense account, use the pre-approved account. You can link as many channels as you want with one Adsense account.
- If you do not have an Adsense account, then you can create one by following the on-screen instructions. Once you have connected your Adsense, then there will be a green mark on the sign up card for Google Adsense. Then click on Done. Your channel will then automatically be put into the review queue. Then it will be reviewed. You can check the status of your application at anytime.
- If accepted in YPP, can set ad preferences and enable monetization on your uploads. If the YPP is rejected, you can reapply within 30 days after the rejection.


